I decided that since Elijah watches Toy Story almost every.single.day, it only made sense that his next birthday should be a Toy Story theme. I also decided my new nickname should be 'the crazy birthday lady' because his birthday isn't even until December and I already have almost everything planned. I just love birthdays! But put some homework in front of me, and all of the sudden, I'm a procrastinator. Funn how that works.
Anyway, I wanted to do another painting like I did for his last birthday with
Lightning McQueen, so I found a picture on the internet, printed it out, and drew a grid on it. Like the other painting, I did this one on a canvas drop cloth, by drawing a grid, like the one on the picture, and hand drawing the design.
I somehow completely didn't take any pictures of the process of Woody's face, so let's move right on to Buzz, shall we?
For the skin tone, I bought a paint that was called flesh tone (or something like that), but it was way too peach, so I added just a tad of mustard to warm it up, and then some white to lighten it up. For the light shadows (pictured below), I just added a little bit more of the mustard color.
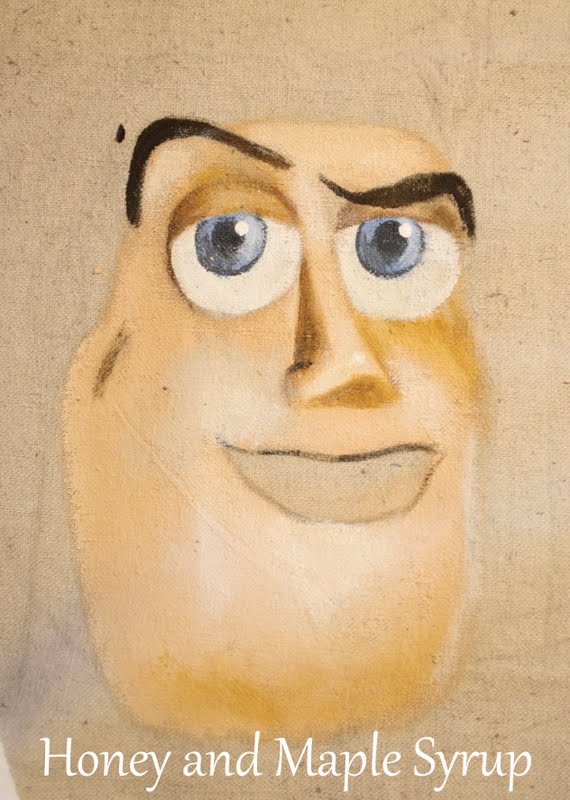
Next, I added a few contour lines around his eyes and his nose and darkened the shadow on his nose with some brown paint.
Next up were his eyes. In the picture below, you can see how flat they look (and how totally different the pupil sizes are! LOL).
I love this next part - doing the highlights and shadows of the eyes - because it really brings the eyes to life. The big white dot also helps them look a little more realistic.
Now he gets some white highlighting around his cheeks, chin, and brow bone.
And we've got some teeth!!
Here I did some brown shading on the side of his face, added his little chin curlicue, and did some highlights on his eyebrows.
Next, I painted his purple helmet-y thingamabob and did white highlights where needed.
Here I did some blue shading on his teeth and eyeballs. It's subtle, but it really helps to make it look dimensional.
I thought I took some pics of painting his body, but evidently I didn't. You can see where I did did all of the shading and highlighting though. It doesn't look exactly like him, but really I wasn't about to paint every single detail. Maybe in a perfect world =)
In the pic below, you can see how much of a difference the shading and highlighting makes. His hands don't have anything done to them yet and they look very flat.
Moving onto Woody, it's time to do his jeans. I started with a dark blue as the base color. As you can see, I didn't stay in the lines, which is why I like doing the background last in a painting like this. You can be a little sloppy and just come and clean the edges with the background color.
Next, I sponged on a light blue color. It would have been a nightmare staying in the lines if the background was painted already!
His legs still look flat (above) so to give them some dimension, I sponge painted some white on the outside of his legs, and some of the dark blue base color on the inside of his legs. Now his little chicken legs look a little rounded out =)
I was thinkin' his jeans looked a little 80's acid washed-like, so while the paint was still wet, I sponged a tiny bit of water all over to blend the colors a bit. I also made some zig zag 'stitching' with some dark blue and black paint. I didn't take a pic of this, but I highlighted a few of the pleats with white paint.
Here is a pic of Buzzs' bod. The shading is all done with a grayish-blue (I think it's called Heritage Blue?).
For Woody's boots, I did a base of brown. It looks like there is some white paint too, but that's just the reflection of the light on the wet paint.
A little highlighting and shadows. Don't worry, it gets better!
Some bucklage on the boots and more highlights.
I wasn't super happy about the color, so I added a little bit of the mustard color.
Now, onto Woody's hat. What a pain in the butt! I would have loved to scrap the whole thing, but I hear a cowboy without his hat is like a yodel without a hey-he-hoo! So I started with a brown basecoat (lighter brown up top).
Next came some highlighting.
And some dark shadows. It still looks a little wonky, but oh well! =)
For the floor, I used white with Behr's Expedition Khaki. I didn't completly mix the two colors because I wanted the floors to be streaky like wood grain.
I dipped the brush in different spots and did long strokes with the brush.
I also added a little bit of brown for some added dimension.
I didn't like how much the 'cracks' stood out, so I lightly brushed over them with the khaki color.
The last thing I did with the floor was tape off the baseboard and washed some light brown across the edge to give the floors some depth.
For the clouds, I made a small stencil and a large stencil and did a random pattern. I mixed a very small amount of grey with the white so that I could do a bright white for the highlight (not pictured).
I finished off the whole thing with some added detail (like Buzzs'plastic helmet and the blue wings on his chest). Also did a little bit of a shadow under their feet so it didn't look like they were floating.
Ok, now I'm officially super excited for his birthday!! So, did I convince you to try painting something like this?
Wall Color - Behr's Sea Rover