Wednesday, April 21, 2010

Mail Holder

To all rusty, junk lovin' people, you may not want to read this post. You have been forewarned =)

Do you remember the old rusty mail holder I got from Denio's this past weekend? 


I was really debating about what to do with it because I loved the rust and the patina, but I wasn't crazy about the color.  As you may recall, I was thinking of painting it a glossy red, but I just couldn't bring myself to completely get rid of the rust, so I compromised.  I decided to do a green wash over it so that the rust would show through, but the color would be a little different. Can you guess what color I decided to use?  Behr's Lucky Bamboo, of course! 


 I added a bit of water to it to make a wash then applied it on the inside of the lid to test it.


When I wiped it off, it pretty much *all* came off, so I ended up using straight-up paint with no water. This is what it looked like with one coat.


It was a little more like the color I wanted, but not enough, so I did another coat.  At first I was dry bushing it on, but that left streaks which was so not the look I was going for.  Since I wanted the rust and some of the original patina to show through, I pounced the surface with the brush (like what you would do if you were stenciling) and then used a paper towel to give it some visual texture.

Here she is after the second coat.


Please note that you can still see some of the rust. I don't wanna give anyone a heart attack here! =)

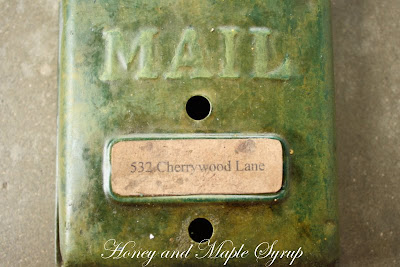
To further age it, I applied some dark walnut wood stain to make the colors richer and I used a q tip to apply some green paint to the letters so they would stand out. You would think I would be pretty much done at this point, but did you notice the little area under the word 'MAIL'? Yeah, it's pretty much screaming for some attention. I'm assuming that's where the address goes. If not, that's just too bad, 'cause I'm puttin' an address there anyway! =)

I made up an address (I swear I don't live at this address, so if you want to stalk me, you *will* get lost. Hehehe), and I printed it out on brown packaging paper. But to avoid the mistake I made with my mini picture frames, I went ahead and taped the brown packaging paper to a piece of printer paper so that it wouldn't get jammed.  After cutting it out to size, I used some brown paint, dark walnut wood stain, and a toothbrush (don't worry, it's a toothbrush I use *only* for painting and *not* to brush my teeth!) and I splattered some paint and dripped some stain on the paper to make it look old.

Are you ready to see what she looks like now?


I left the inside unpainted because it would have been a pain to paint and I wanted to leave a little bit of the original patina.


I'm still trying to decide how I feel about this ol' rusty mail holder, but I think it'll grow on me eventually =)


Tuesday, April 20, 2010

Going Global

Good afternoon all.  I just wanted to share my picture I uploaded on facebook for the Home Goods' Happy Spring Challenge.  This week the theme is Going Global and here is my picture:


I've had a recent infatuation with globes. The middle one is from Home Goods. I got it for $60, but it's valued at $100. The other 2 globes are from World Market. The trunk on the left was from Michael's a few years back and I bought it when it was on sale for 40% off.  The trunk on the right was a hand me down. The box that the globe is sitting on on the left was from Salvation Army.  It's a wine gift box and I gave it a coat of dark stain. It cost $2, but they were having a 50% off sale, so I got it for $1.  The lanterns hanging on the shelf were bought at Big Lots *years* ago for around $3 each.  The metal file baskets on the wall were from my Grandpa's stash 'o junk so they were FREE. And you can find my map clothespins project here, which hold postcards from different parts of the world.  The picture of the plant was bought quite a long time ago at Ross for $40, I think. The wicker chairs used to be white and oh-so country, but I spray painted them espresso. The storage cubes, used as footrests, were a Home Goods purchase - Just $20 a pop. And of course there is my step ladder side table, which I love so much. On top is a lantern I bought on clearance at World Market and also a very old pair of binoculars I bought off of ebay. 

All in all, this area was pretty cheap to put together.  I had to lighten the picture quite a bit because the shelf area was so dark in all the pictures I took. I'm kind of a vampire and prefer rooms to be dim with some mood lighting.

So there you have it! I'm not expecting to win, but I thought it would be fun to at least submit my photo. If you have a chance, go check out some of the entries or even upload your own photo!

Sunday, April 18, 2010

Denio's Treasures

I braved the crowds (I swear everyone was out today!) and went to Denio's Farmers Market and Swap Meet and I wanted to share the goodies that I got.

First off, I got this rusty old mail holder.  Even though it has a great patina, the guy selling it mentioned it just needs a coat of paint which planted a seed in my head.  I know my rusty lovin' friends are wondering what on earth I'm thinking, but I could really see this guy a bright glossy red.  Still haven't decided yet.

Asking for $5.
Bought for $3.


Next up is this great rusty green box. They said it was used for Pearl Harbor. Not sure if it's true, but I'll go with it =) It also came with a lovely white spider, which thankfully scurried away right before I picked it up. I almost screamed, sending everyone in a frenzy, but I was able to keep my composure and managed to scream inside.

Asking for $10.
Bought for $8.


Says 'AMMO BOX' on the front.


The next thing I got just looked cool. Wasn't quite sure what it was, but I did some research online and found out The Bastian Blessing Co. distributed soda fountain machines, so I'm guessing that's what this is from.

Asking for $5.
Bought for $5 (since I already talked the guy down on the mail holder).


And last, but not least, I bought a glass dome...


from an ugly clock like this (sorry if that offends anyone, but I just don't like 'em).


Anybody see where I'm going with this? That's right...a cloche!!


He was asking for $5 for the clock and all, but he let my buy the glass for just $3. That's cheaper than any cloche you will find in a store and this is a big sucker!

I hope you enjoyed looking at my treasures as much as I enjoyed buying them!

Friday, April 16, 2010

Mini Picture Frames

Ok, so this is just phase 1 of a 2-phase project...*hopefully*. I'm not quite sure yet if phase 2 will pan out, but I sure am keeping my fingers crossed! Anyway, I started out with some little (as in like, 3x3 inch) frames from the dollar section of Michael's. I love the detail, but the color?...Not so much. *UPDATE: I checked my receipt and they were really only 50 cents each!


In comes my Behr Lucky Bamboo paint. Yay, now I love the detail *and* the color!


But of course they needed some character so I whipped out my trustee Minwax Early American wood stain to give them some age spots (ew, that sounds so gross!).


Ok, so you can't really see it that well in the picture, but I assure you it's there!

I decided that I wanted to print some numbers out to frame in these little beauties, but there was no way I was going to print them on boring white printer paper. Nope, I'd rather print them on boring brown packaging paper...just a tad bit snazzier than the white. Just a word of advice for anyone who tries this at home - you have to help guide the paper into the printer or else you will end up with something like this:


But I guess it probably didn't help that I cut the paper crooked and jagged =)

Another word of advice - make sure you leave plenty of space surrounding each number. Yeah, the first time I printed the numbers there was not enough space and the second time I printed...well, see pic above.


Next step is pretty straightforward. Just cut out the numbers and put them in the frames. I tore the cardboard backing off so that they would lay flush and I just used regular ol' tape to keep them in place. I just realized the picture above looks like it's crooked, but it's really just an optical illusion. Hmmm.  Anyway, here they are, waiting for phase 2 of the project.


And yes, I realize the numbers are not centered, hehehe. Oh, and you might be wondering why I printed a number 4 and the reason is because I was hoping to find another frame at Michael's, but they were all gone by the time I went back.
Stay tuned for the possible phase 2, which by the way, won't happen for a few months if at all.

I'm linking up to Funky Junk Interiors.

Sunday, April 11, 2010

Ballard Designs Knockoff - Rope Knot Doorstop

My sis and I were out shopping the other day (really it started out as window shopping because I knew I *wasn't* going to buy anything) and my sis pointed something out to me that was in the back of the bottom shelf.  I was *so* excited when I looked down into the cavernous depth of the shelf and saw this little guy peeking out of the shadows.


And the price of this bad boy?


For anyone out there who hasn't seen this $39 version in the Ballards catalog, here it is.


Besides the droopy handle and softer texture of mine, I would have to say they're a pretty darn close match...oh, except mine cost $31 less!!

Don't you just love finding a Ballard or PB knockoff for so cheap?

I know I'm gonna hear an earful about this purchase...something like, "What is that?! It holds a door open? When are we ever going to use that?".  Oh, silly men - they just don't get it!

Lamp Revamp

I was out shopping at Home Goods the other day (I have no idea why I go there when I am trying to save money for moving because I ALWAYS find something I *need*!) and I found this lamp.


But in my defense, it was only $16...$16 folks!!


That's quite a bargain  when you consider this Ikea lamp for $39.99.

Or this Pottery Barn lamp for a whopping $119!


I'm sure we can all agree that the Ikea and Pottery Barn lamps look *much* better though.  I mean, the shape of my bargain lamp is pretty similar, but the color is hideous! And if you look closely, you can see some weird lines that I think were meant to give it an aged look, but really it just looks like faux gone wrong.


It's kind of funny though because the lady at the cash register was going on about how it was such a great lamp and she loved the color, especially the cord. Barf! Little did she know, that was soon going to change. I didn't take pictures of the process because it was pretty straightforward - a little bit of primer, some matte black paint, and some matte finish spray paint - but the end result is drastically different. I absolutely LOVE how it turned out! For about $20 (the lamp plus some paint), I have a brand new, expensive-looking lamp!


Wednesday, April 7, 2010

Map Clothespins

I was trying to think of a way to display some postcards the other day when I remembered about some old wire office trays I acquired from my grandparent's house. I heart old metal, ahhh. Anyway, I figured I could clip them on with some good ol' clothespins, but honestly I'm not a fan of the light wood look, so cue the trumpets and welcome the stain!


It's *so* much easier if you just dip each half in the stain rather than applying it with a cloth. I know, I know, sounds pretty obvious, but I generally do things the hard way and don't think of the easy way until *after* I finish a project!

So once the stain was nice and dry, I looked at my little clothespins and knew they needed more. Cue the trumpets and now welcome a map of the Sacramento area! Hey, I need something to remind me of California when I move to New Jersey =) I made sure to include some areas that have significance to me, like the city I currently live in and even my street.

My favorite method of sticking things together is using spray adhesive. I have used it on many design projects in school and it really holds things together...I mean *really*! As in you don't want to spray it anywhere except the items you want to stick together.


After spraying the spray adhesive on the map I held the map up to the light with the side I wanted showing facing down toward me, then I put the clothespin on top of the map where the spray adhesive was. That helped me to get the words placed exactly where I wanted them to be. After letting them dry, I tried 2 different method of cutting the excess map: tearing and cutting with scissors.


I ended cutting all of them to get a nice clean look and then I went over the edges with sandpaper and this is what I ended up with.


But of course I couldn't leave them looking so clean, so I decided to expirement with using wood stain over the maps. I learned a very valuable lesson when doing this. I figured it would work just like wood where you apply the stain, wait a minute, then wipe it off, but it doesn't work quite that way with paper ::blush::


You can tell by the above picture that I gradually learned that less is more. It's best to get stain on your rag, then wipe most of it off, then lightly apply the stain to your paper.  I think I'll probably make a few more to get the lighter look since you can barely see the map on the dark clothespins.

All in all, I'm pretty happy with the results and I know they will bring me good memories and make me smile on those cold New Jersey days.


Related Posts with Thumbnails