Wednesday, July 14, 2010

Revamped Bookcases

I've been eyeballing some awesome bookcases from my grandpa's house for a few months now because I knew they would be perfect for Elijah's room. They've actually been there my whole life, but they were covered by so much stuff/junk/treasures (or whatever you wanna call it) that I never noticed them 'til a few months ago! Anywho, my grandpa very graciously passed them down to me just in time for me to paint them before the move. Here is a pic of one of the two with the shelves already removed.


They look alright from far away, but they definitely had been abused over the years.


And of course Elijah had to get in on the action.


Once I was able to pry him off, I immediately got to work sanding and cleaning off the bookcases (in like, 94 degree weather!). I guess the story behind these is that they were display cases in a pharmacy, and when they closed down, my grandparents snagged them up.  Given how old they are, I probably should have worn a mask when I sanded, but I didn't, so if you don't hear from me ever again, you'll know what happened =)

I didn't repair any dings or that horrible corner where a chunk of wood is missing. Thank goodness for rustic style 'cause these puppies sure wouldn't pass as elegant, by any means!

Now, as for color, I wanted to pull out the green from Elijah's quilt, but none of the color samples matched, so I went ahead and did the color match at Home Depot. FYI, they can only use solid fabric (no patterns), so since the green is his quilt has dots, I brought a piece of scrapbook paper that was very close in color. I also went ahead and got the Behr Premium Plus Ultra because it has primer mixed in already. It does cost a little bit more ($15), but considering you don't have to buy primer, it's definitely worth it.


And in case anyone wants to know the color, here is the formula:


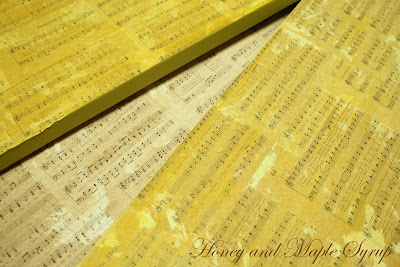
I left the shelves to paint last and I only had enough to do one side, so I thought it was the perfect opportunity to try my hand at decoupage.  While I was at my grandpa's, I picked up a youth hymnal book and thought that would be perfect. Just a tip for anyone who wants to try this, make sure to cut off as much dead space as possible. You can see the difference it makes in this picture:


After I finished, I was thinking it was a little stark, so I took some diluted brown paint to it, then wiped it off with a paper towel.

Whoo, look at all those air bubbles!

So here it is all painted with the shelves done:


It looked alright, but honestly, I wasn't happy with the color of the sheet music. It's kind of hard to tell in the picture, but it almost has a tinge of pink. I'm not one to just quit when I don't like something, so I had to come up with an idea. Later that night a light bulb went off. Old paper has more of a yellowish tint, so I pulled out my ochre acrylic paint.


I mixed it with a little water and did the same thing.


Don't worry, it looks a lot brighter in the picture than it does in real life! Oh, and you probably noticed those weird splotches. Evidently I'm a little messy and got decoupage glue everywhere, but I actually like how it gives it more character.

They all turned out a little bit different.

Once again, brighter in the picture.

I love LOVE how they look in the bookcases and I love that I have the option of the sheet music or green paint.


I'm not quite done with these bad boys, so you'll have to come back to see what else I do
=)


Join us Saturdays at tatertotsandjello.com for the weekend wrap up party!

Funky Junk's Sat Nite Special

Monday, July 5, 2010

Pink Flower Necklace

WARNING: I am NOT a professional maker of jewelry, so please bear with me.

About a month ago, I went to Kohl's and spotted this beautiful necklace.


Ok, you are probably wondering which one since there are a billion!  I'm talking about the big flower necklace. I loved how the petals looked like glass and I loved the fact that it was so big (dainty little necklaces pretty much accentuate my broad linebacker shoulders!). The problem with the necklace was that it was around $22 or so. I know that's pocket change for some people, but not for me!

I seriously could not get my mind off of this necklace so I decided to go back and take a picture of it so I could attempt to make something similar.  I knew right away that I wanted to use plastic so that I could paint the underside to give it a glassy look, but where would I get the plastic from?
Well, it just so happens that my dad took my son to Wally World and bought him this:

(Well, there was a toy in there, but Elijah already took it out before I took this picture!)

Have I ever mentioned how spoiled my son is? I guess that's what grandparents are for though! Anyway, the plastic packaging was perfect. I'm not suggesting that you go out and buy this toy for your kids just to make the necklace, but I'm sure your kids wouldn't really mind =)  If not though, you could always use a plastic soda bottle.

Ok, so I had my plastic, but I needed a template for the flower (I really don't trust my freehand skills!), so I looked online and found this:


I did have to resize it, but I used IrfanView which made it super simple (I resized it to 220 for the width).

Next, I copied and pasted 3 flowers into a Word document and printed it out.


Then, I did a rough cut and taped it onto the plastic...


and then cut the individual flowers out. Once that was done, I picked the prettiest pink out of my paint box and went ahead and painted them.


Here they are with the backside painted:


I also did 2 coats of a matte finish to prevent scratches since no primer was used.  Once that was dry, it was time to attach some embellishments to the front. I went to Joann's and bought these flowers for $2.99.


I ended up using the inner petals only.


I also got a pack of 3 buttons for $1.50.  To attach the embellishments, I started by placing a button in the center of each flower and poking through the holes with a craft knife.

(If you look really hard, you can see the two holes)

Then I used some fishing line and strung it from the back, through the center of the silk flower, then up and around the button, back through the center of the silk flower, then through the second hole I made in the plastic flower and finished it off with a square knot. Are ya still with me?

After I added the embellishments to all flowers,I decided to attach the flowers with jump rings, like in the inspiration necklace, so I decided where I wanted them and then made a little hole using a craft knife.


I also attached the chain using jump rings. And since I wanted the necklace to be long (remember the shoulders, folks?), I didn't have to bother with a clasp.


It looked so pretty up close, but from far away, the chain just looked too plain.


So once again, I referred back to the inspiration necklace and noticed they used ribbon with the chain.  Fortunately, I already had the perfect pink ribbon in my stash.


I threaded the ribbon through each jump ring (using enough to do a double strand) and tied a knot, then I tied the ends.


Ahhh, much better!


Total cost? $4.50 for the flowers and buttons. Much better than $22!

Here is a pic of the inspiration piece again:


It's not identical, but mine has the main elements that I liked in the original.

Hmm, now I guess I need to actually get out of the house and wear it somewhere!


All Thingz Related
           
Funky Junk's Sat Nite Special

Thursday, July 1, 2010

It's Finished!

My half project is pretty much finished!  And since I made you guys wait a whole day wondering what on earth this was going to be (I'm so sorry if it kept you up at night!), I'll let you know what I made with these boards: a tabletop!


These boards are 1x4's and 6' long. I sanded them down and rounded the edges (think picnic table here) and then stained them Minwax Dark Walnut. The picture above is just one coat of stain, which wasn't as dark as I liked, so I did another coat.
You can see in the picture below how much of a difference a second coat makes.


Next, I polyurethaned them. I was thinking of doing a glossy finish, but I wanted this to look rustic, so I went against my better judgement a did a satin finish. I loved how it looked while the poly was wet, but once it dried, it just looked too flat and boring. After that, I decided to gloss it up a bit and I did 3 more coats of semi-gloss, which really brought out the the warmth of the wood and made it look much richer (not money-wise, but you know what I mean =) ).


(Sorry about the glare, but the garage doesn't have the best lighting)

I used 10 boards for the tabletop and my dad cut 2 cross pieces for the bottom and screwed them in underneath.


He cut them a little shorter than the length of the table and angled them so they wouldn't stick out like a sore thumb.  I still need to clean up the underside and poly it, but it's pretty much done! And it was so super duper easy to make =)

Sorry I can't show you the whole thing, but the base I am using is in storage in NJ. I'll be doctoring that up too once I get there. Stay tuned - I think you'll like it!


Funky Junk's Sat Nite Special

Catalog Living

Hey everyone! I just wanted to share this link for anyone who is interested.


It's "A look into the exciting lives of the people who live in your catalogs". Hopefully the captions will put a smile on your face =)

(Pottery Barn)

Wednesday, June 30, 2010

Something's In The Works

I have to admit, I haven't been working on too many projects lately.  Well, at least fun, creative projects. Why, you ask? 1) Because it is just too dang hot to be outside or in the garage painting away (we're talkin' triple digits here!), and 2) Because I have been a busy bee trying to get things packed and organized. If everything goes as planned (which so far nothing has gone as planned), I will be making my cross-country move in about 4 weeks.  That means going through oodles and oodles of stuff, trying to figure out what to keep or give away, packing a bazillion boxes, finding the best moving company, and hammering out lots and lots of details. But unfortunately, on top of all of that excitement, I still have a billion projects (the fun, creative kind) to work on before moving.
My current project should be done within the next several days, although it's really more like a 'half project' because the other half is awaiting me in New Jersey. And of course I can't leave you with no pictures, so here's a sneak peek of what I'm working on.


Related Posts with Thumbnails