
I decided a while back that Elijah would be having a Lightning McQueen birthday since he is pretty much obsessed with the movie, and I knew right away I wanted to paint a mural to use as a focal point. I have a little confession to make though - his birthday isn't until December! It's okay, you can call me crazy. I've already come to terms with that fact. No, but in all honesty, I just wanted to have it done before we move in 5 weeks (is it really only 5 weeks now??).
I was planning on doing a tutorial until I realized that would make for a ridiculously long post that nobody would want to read, so I am just showing you guys how things evolved and then I will point out a few important parts.
First, I started with a 4x5ft drop cloth from Lowe's (I want to say it cost less than $5). I ironed it, but the folds seemed to come right back. It's okay though because the paint flattens it out.
I found an image of Lightning McQueen on the internet (from here on out he will be called LM 'cause it's so much easier to type!), cropped it, then printed it out. I then made a grid on the paper with the lines spaced an inch apart. There was a little bit of ungridded (not so sure that is a real word) space that I just cut off. I then made a grid on the drop cloth, spaced a foot apart, and sketched LM onto the drop cloth the best I could.
TIP: Don't make the lines too dark because they will show through the paint. It's kind of hard to erase the lines so it's better too just draw them lightly.

You could use primer, which would probably give you a better end result, but since I am going to be rolling this up for our move, I decided to skip primer so that the paint wouldn't be too thick.
With this next picture, I had painted the base coat for his body and 2 of the tires. I get a little ADD when I paint and like to skip to some detail because I'm just a tad bit impatient and want to see how things will look, like, now! Hence the reason I painted the headlights and his mouth and did some shading.

He was still looking really funky, so I went ahead and painted his eyes. I had such a hard time getting the right eye color, but it turned out close enough.

Next, I painted the '95' and the base coat for the rims. Just ignore the black splotch under his back tire. I wasn't paying attention and I painted way out of the line ::blush::

Next up was the rim detail and learning that the tire wasn't quite round. Oh, and he also got his lightning symbol.

The picture below shows how extremely crooked I made the line for his hood. I had to go back and repaint it, but you can still see the original line in the finished product. Oops!

The background in the movie is very toned down and hazy so I mixed some blue paint with lots of white to get a good sky color.

I completely forgot to take pics from the last picture to the finish, so here is the finished product!
(Please ignore the totally crooked background and just pretend I did it on purpose to make it look like a hill)

Alright, now for some details!
I think when people think of shadows, they automatically think of black, but that isn't always the case. I actually used a dark, smoky blue. I mixed some black with the blue to use where the shadow meets his body/tires.
I also used a light blue to paint most of his teeth and reserved the bright white for the highlights.

To create a hazy look for the mountains, I just painted sloppily so that I wouldn't get a clean line for the outline. I had some issues with these and think they could use some work, but I am so done painting!

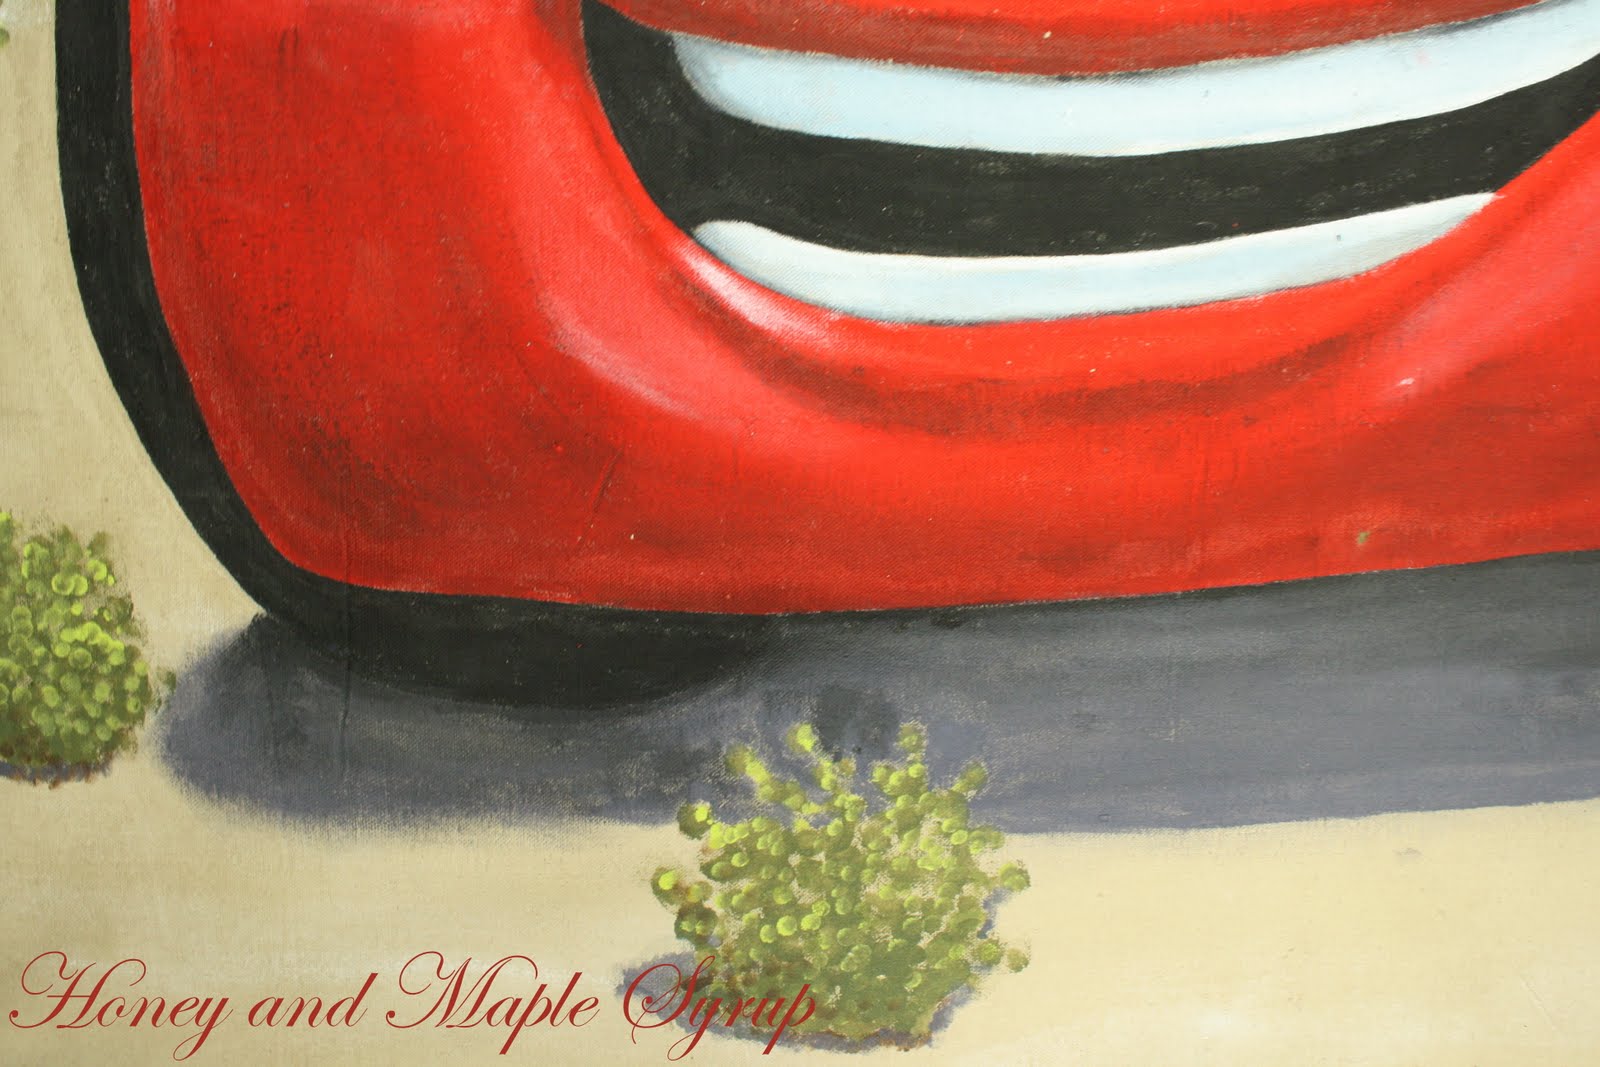
For the plants, I used a spouncer for the dark green and then an itty bitty spouncer for the light green highlights. I also used the little spouncer to create shadows with smoky blue.

For the little plants in the background, I used the small spouncer and made the plants smaller and more condensed as they got closer to the mountains. I also didn't use the light green for highlighting because colors look less vivid the further an object is from you.

Here's a closeup of the tire just because =)

It's hard to tell in this picture, but I added silver sparkles to his thunder bolt.

And here is the finished product again.
I'm not going to say this project was easy, but I know Elijah will love it which will make it all worth it. Stay tuned for more Cars projects. I have some more ideas whirling around in my crazy head and will show you guys how it all comes together in just a few months!
If any of you decide to try painting something like this, I would love to see how it turns out! FYI the paint will seep through the back, so I suggest using a plastic drop cloth underneath. Also, the canvas will stretch as you paint the edges, so when you hang it, you will need to tack the bottom corners down too.


14 comments:
That is adorable! You are so talented! What a lucky little boy!!!
One of my little boys, aka my husband, would be so jealous! He's a kid at heart when it comes to this movie. You did an INCREDIBLE job!
ADorABLE! love it!
that is amazing! you are awesome and will have a very lucky little boy!
You did a great job, Ali! He's gonna have a great party even if it is a few months away :)
you did a wonderful job...looks professional!
You did an AMAZING job!! WoW!
Thanks for joining us!
{Rebekah}
You are amazing!!
I would if you came and linked to Socialize with me Monday til Sunday at Simpsonized Crafts : http://simpsonizedcraftsandthensome.blogspot.com/2010/09/socialize-with-me-monday-til-sunday.html
Ali... you did an amazing job! Love this! Great art!
I still can't believe you did this!!
I'm so glad you were able to stop by and link up to Socialize with me Monday til Sunday! :)
We featured this, today, as one of {Our Favorite Thingz}!
Absolutely fantastic mural, you are a very talented painter. The shading and highlights look amazing, and very clever to use the grid method of transferring the image. Makes me wish I could have a racecar themed birthday party!
girlfriend... you have some MAD drawing skills!!!
i love looking at all of your projects! :o)
I have a major McQueen fan in my house so I am VERY impressed by this! Looks amazing :)
Post a Comment